Installation Guide
This guide provides a detailed, step-by-step procedure for installing LabPress on a typical web server. It covers environment requirements, downloading the source code, creating the database, configuring the database connection, importing the initial data, setting directory permissions, and completing the initial login.
1. Prerequisites
Before installing LabPress, ensure that your server environment meets the following requirements.
1.1 Web Server
Any modern web server that supports PHP can be used:
- Apache 2.4 or higher
- Nginx 1.18 or higher
URL rewriting is not required for the default flat-file routing. If you choose to enable clean URLs later, additional rewrite rules may be needed, but this is optional.
1.2 PHP Version
PHP 7.4 or higher is required.
The following PHP extensions must be enabled:
| Extension | Required | Purpose |
|---|---|---|
pdo | Yes | Database abstraction layer |
pdo_mysql | Yes | MySQL driver for PDO |
json | Yes | JSON encoding/decoding for APIs and settings |
mbstring | Yes | Multibyte string handling (used by tools) |
session | Yes | User login and permission management |
fileinfo | Yes | File type detection during image upload |
zip | Yes | Plugin ZIP installation |
openssl is recommended but not strictly required for core functionality. It may be used by other components in the future.
You can verify your PHP configuration by creating a temporary phpinfo.php file with the following content and accessing it from a browser:
Remove this file after checking.
1.3 Database Server
One of the following:
- MySQL 5.7 or higher
- MariaDB 10.3 or higher
LabPress uses the utf8mb4 character set. If you are using MySQL 5.7, ensure that your server supports utf8mb4 and that the SQL dump is compatible. The provided labpressexample.sql was generated using MySQL 8.0 and may use utf8mb4_0900_ai_ci collation. If you are using MySQL 5.7, you may need to replace utf8mb4_0900_ai_ci with utf8mb4_general_ci before importing.
2. Downloading LabPress
You can obtain the LabPress source code using either of the two methods below. They are equivalent; choose whichever is more convenient for you.
2.1 Method 1 : Clone the Repository
You can run the following command :
Then move the contents of the LabPress directory to your web server's document root.
Method 2: Download the ZIP Archive
Download the latest release ZIP from the GitHub repository.Releases · GuiHui-huimy/LabPress Extract the archive and upload the extracted files to your web server.
2.3 Check your directory
After extraction, the directory should look like this:
LabPress/
├── admin/
├── api/
├── assets/
├── includes/
├── languages/
├── plugins/
├── uploads/
├── images/
├── ReadImg/
├── index.php
├── tools.php
├── projects.php
├── publications.php
├── news.php
├── labpressexample.sql
├── .gitignore
├── LICENSE
└── README.md
3. Database Setup and Initial Data Import
LabPress requires a MySQL database. The repository includes a sample SQL dump named labpressexample.sql, which creates all required tables and inserts default content. This file does not contain a CREATE DATABASE statement; you must create an empty database first, then import the SQL file.
Two methods are provided below. Method 1 (phpMyAdmin) is recommended, especially if you are using the BaoTa (宝塔) server panel, because it provides a graphical interface and avoids common command-line mistakes.
Method 1: Using phpMyAdmin (Recommended, especially for BaoTa Panel)
This method is suitable for users who manage their server with the BaoTa panel or any hosting control panel that includes phpMyAdmin.
- Log in to your BaoTa panel.
- In the left sidebar, click Database (数据库).
- Click Add Database (添加数据库).
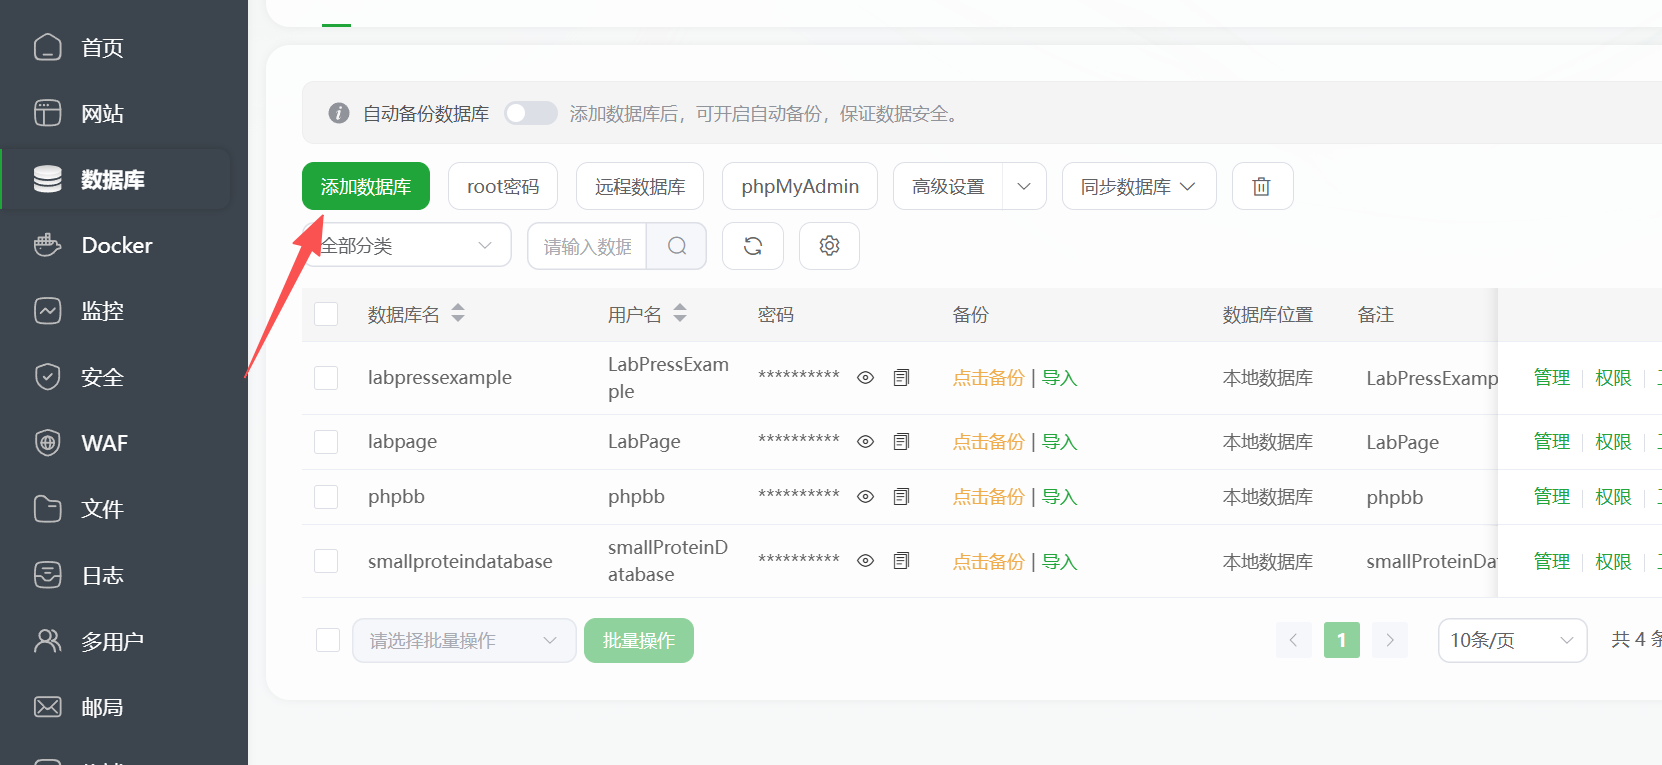
- Set the database name, for example
labpress. - Choose
utf8mb4as the character set andutf8mb4_general_cias the collation. - Create a database user and password, or use an existing one with full privileges.
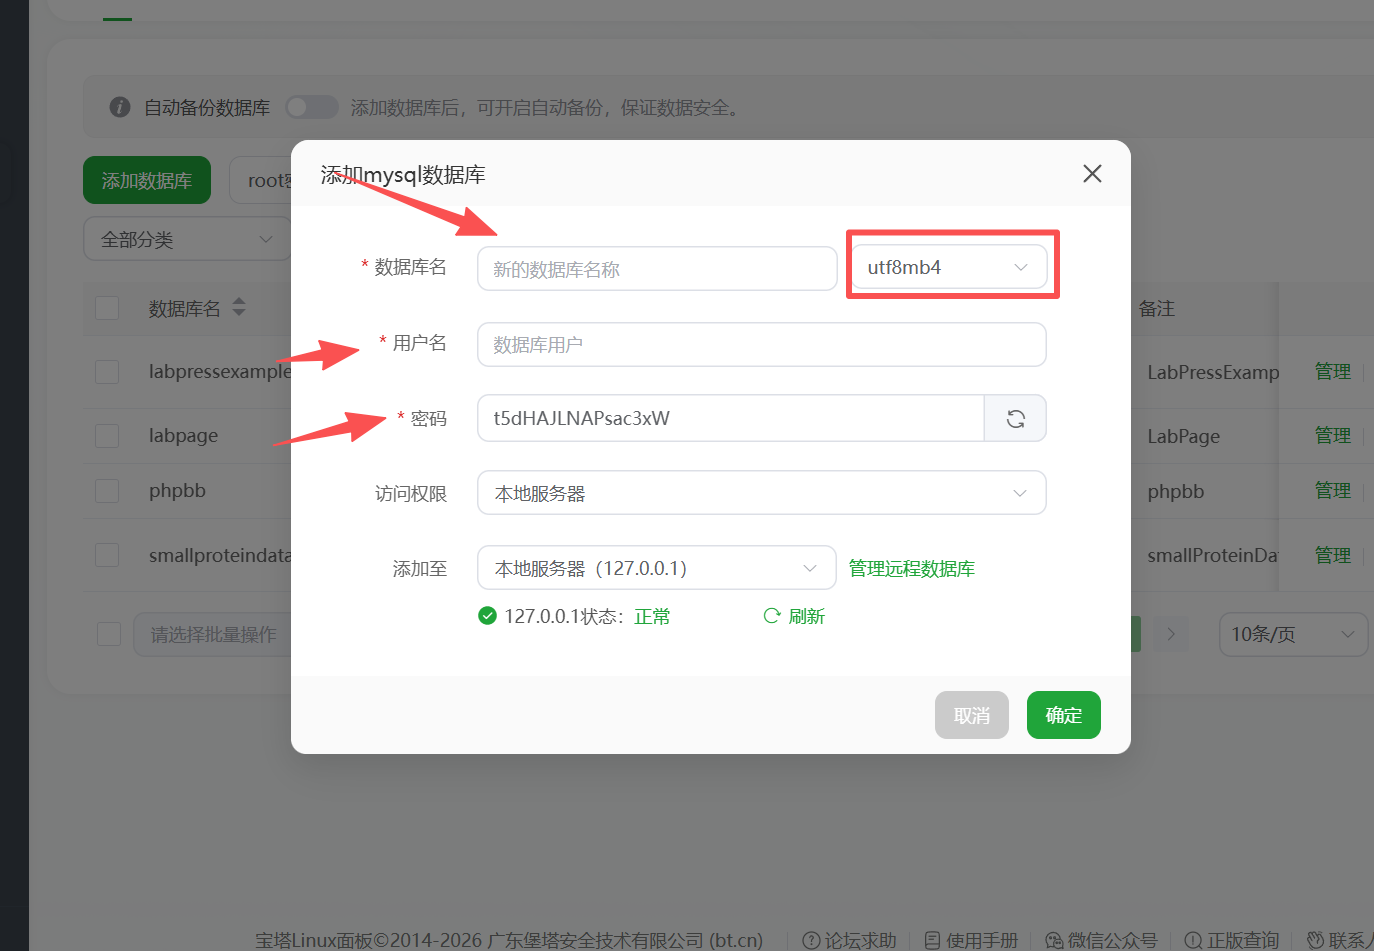
- Note down the database name, username, and password. You will need them later in
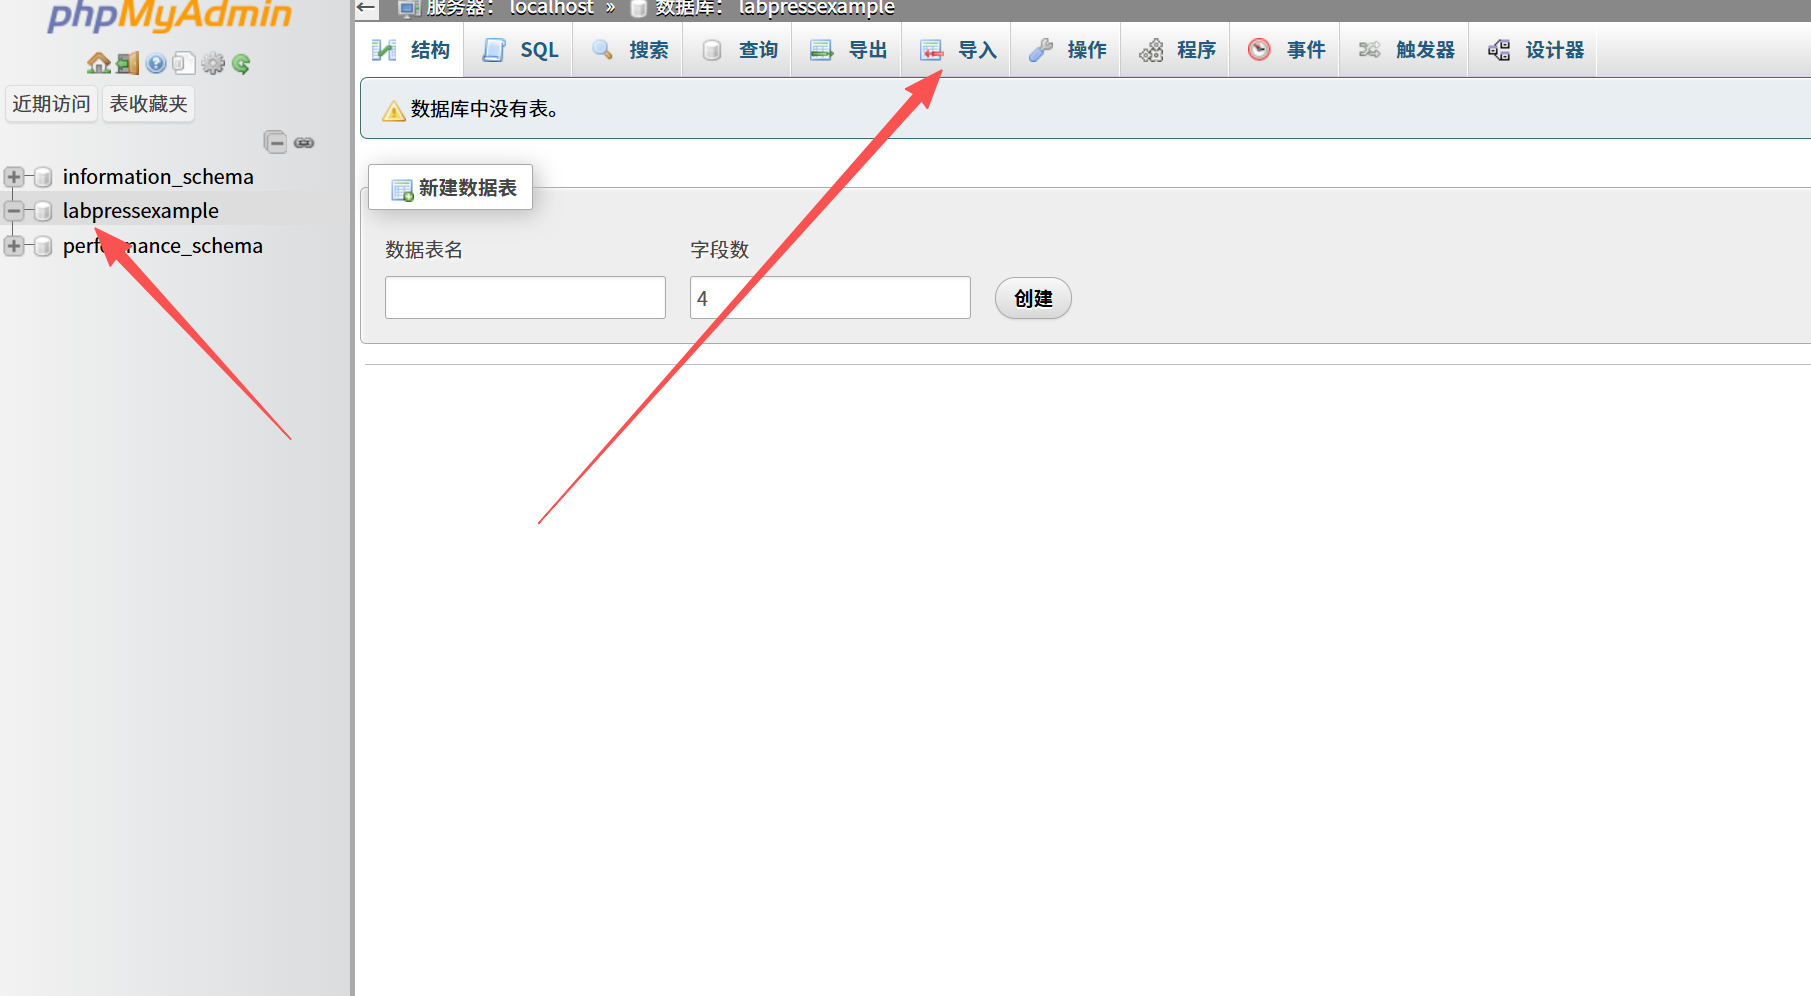
includes/config.php. - After creating the database, find it in the database list and click the phpMyAdmin button (or open phpMyAdmin from the panel).
- In phpMyAdmin, click the database name (
labpress) in the left sidebar to select it. - Click the Import (导入) tab at the top.
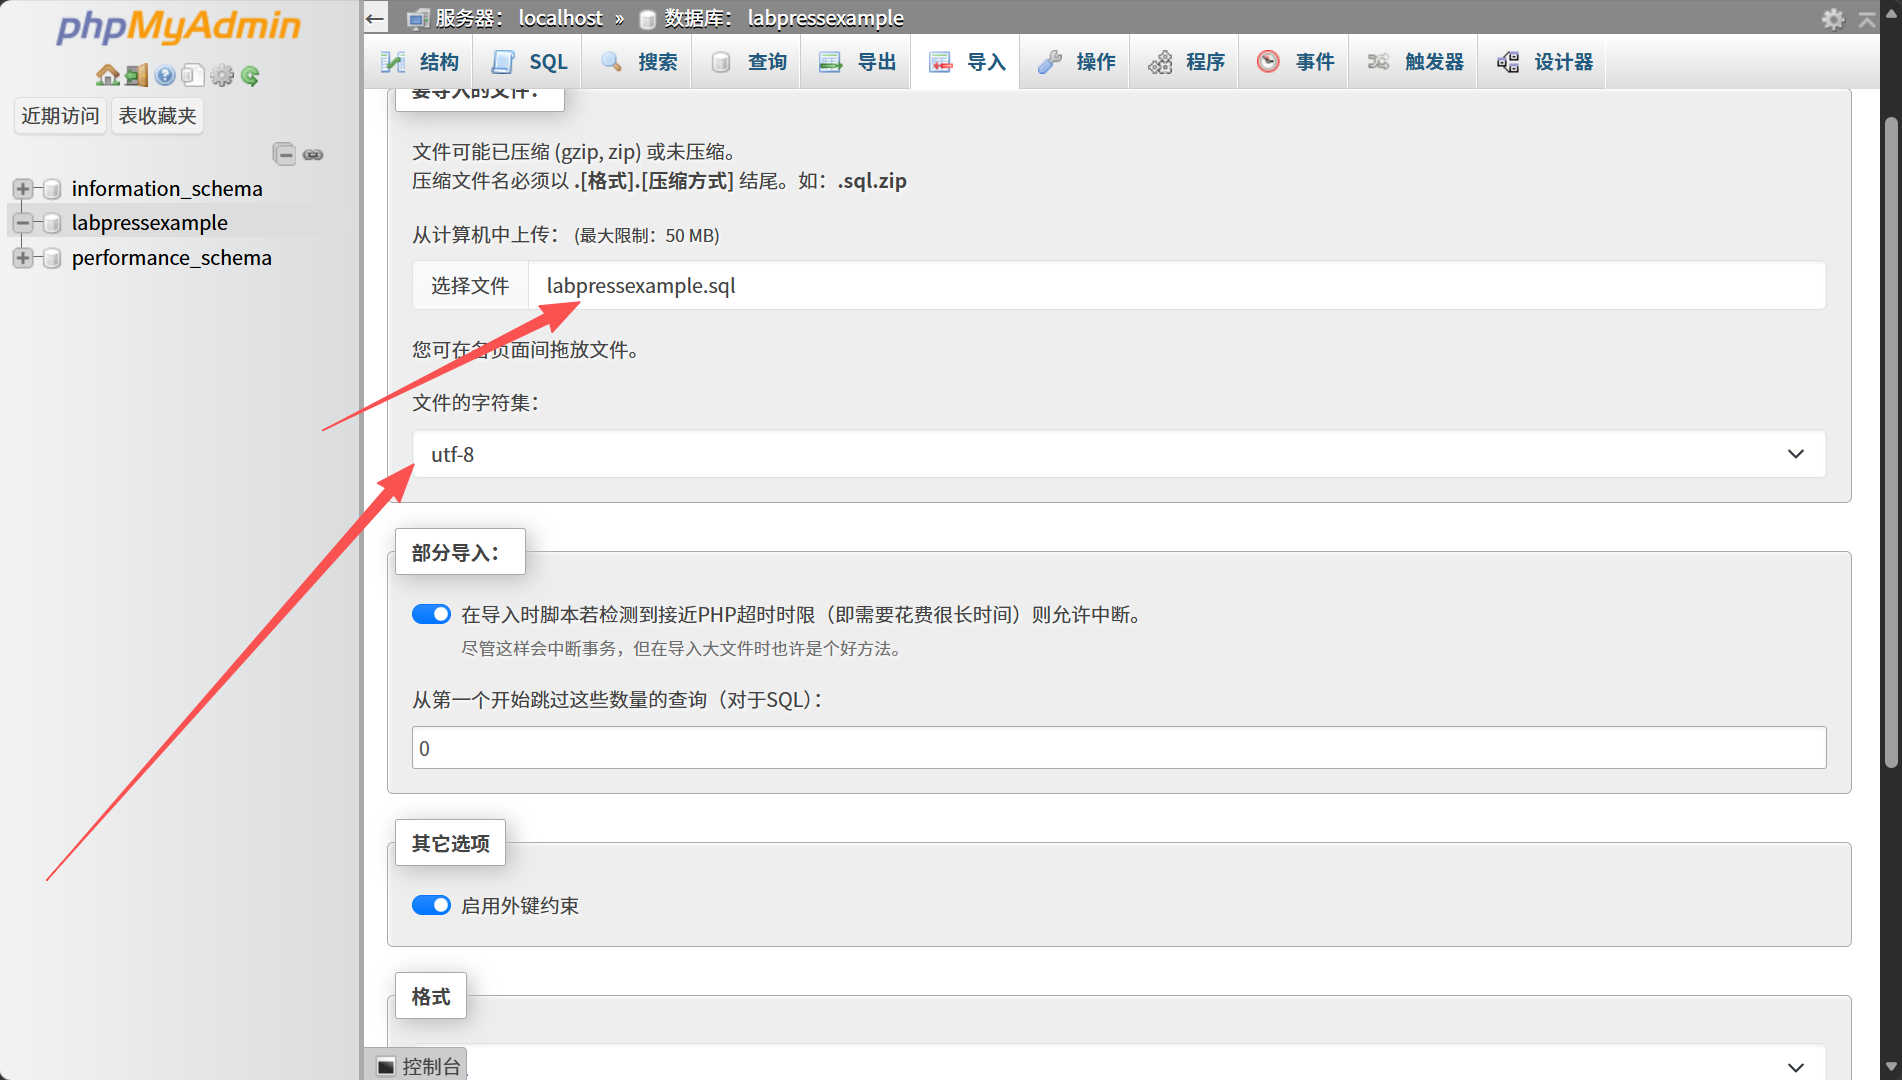
- Under File to import, click Choose File (选择文件) and select the
labpressexample.sqlfile from your computer. - Leave the format as SQL, then click Go (执行) at the bottom.
- Wait for the import to finish. phpMyAdmin will show a success message. All tables and sample data will now be created.
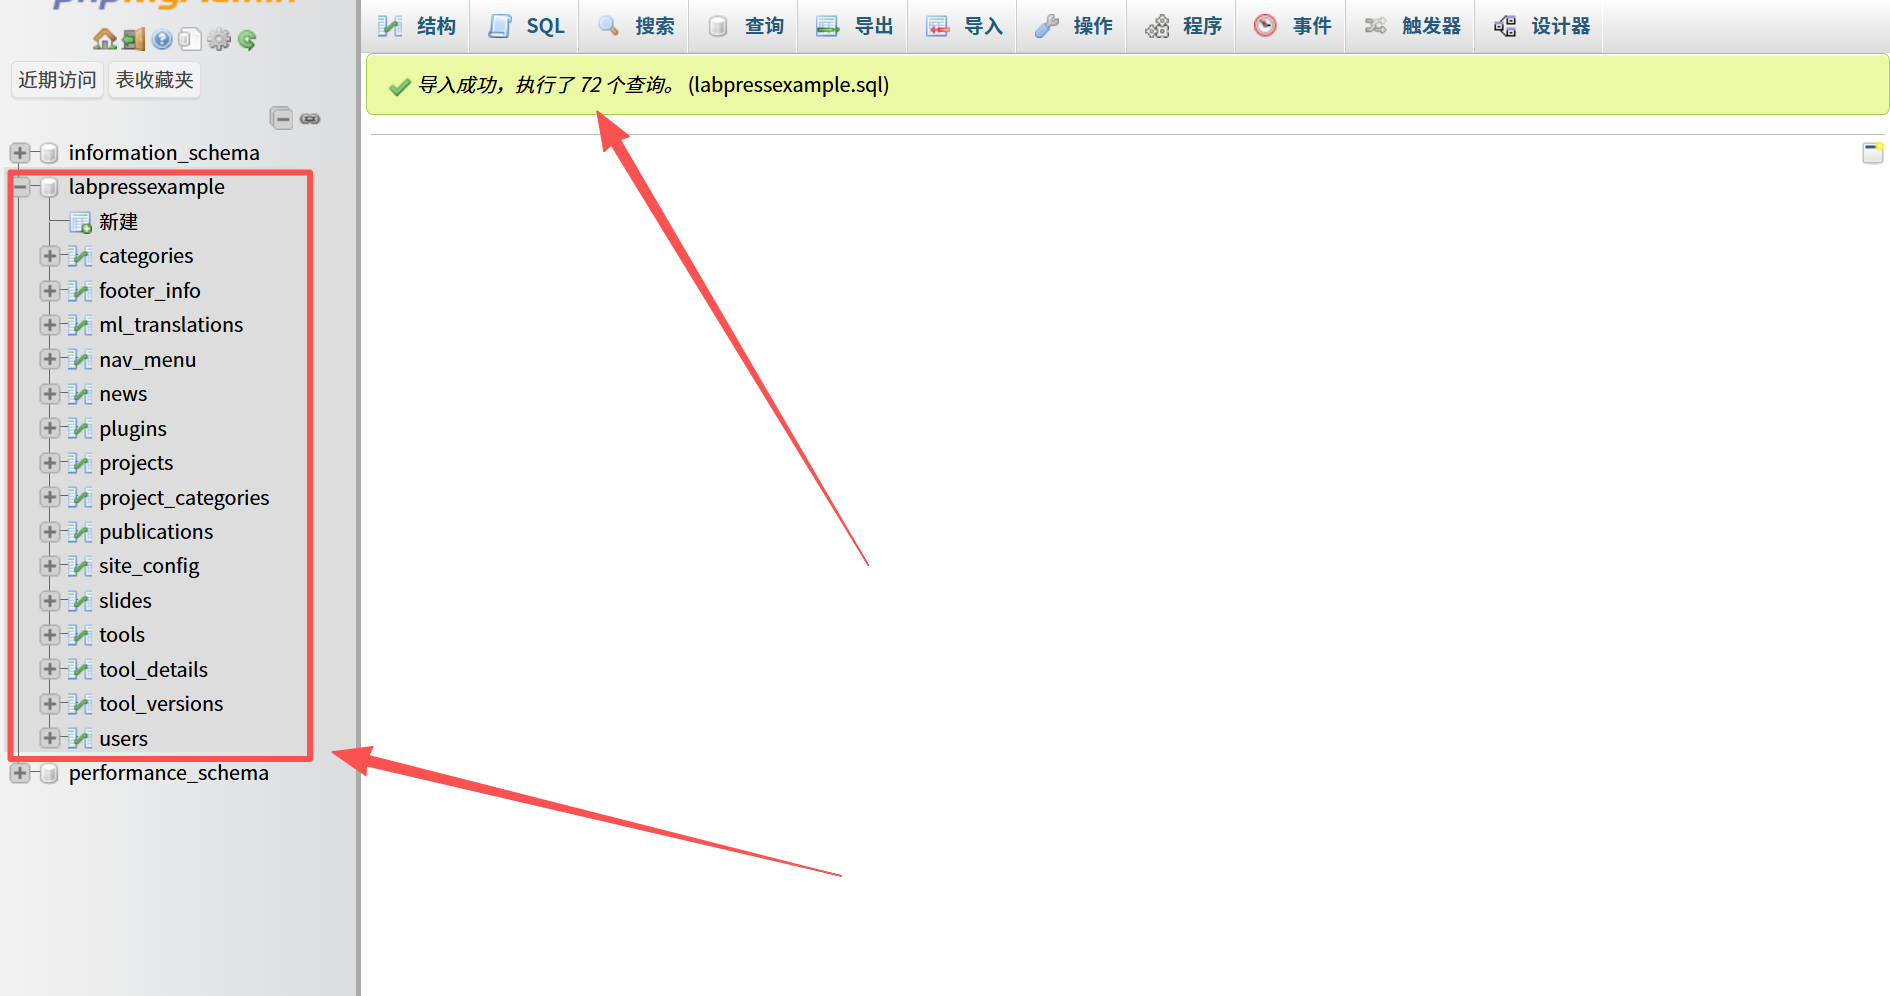
Method 2: Using the MySQL Command Line
This method is suitable for users who have direct terminal access to the MySQL server.
-
Create a database and user (if not already created). Run the following commands in the MySQL shell:
If the database already exists, skip this step. -
Import the SQL file from your terminal:
You will be prompted for the password. After successful import, the command returns silently. -
Verify the import by logging into MySQL and checking the tables:
Whichever method you choose, make sure the database connection details in includes/config.php match the database name, username, and password you used.
4. Configuring the Database Connection
LabPress reads database credentials from includes/config.php. This file is provided with the project and contains the default database connection constants that you must update to match your own environment and your database user information.
4.1 Locate the Configuration File and Back up the Configuration File (Optional)
Open the file includes/config.php in a text editor. For security, before making changes, you can create a backup copy of the default configuration file.
#cd to includes directory
cd includes
#copy the default file to back up
cp config.php config.php.bak
4.2 Edit the Configuration
Open includes/config.php in a text editor and set the following constants:
<?php
session_start();
//Here you need to modify
//1.Your database host location
define('DB_HOST', 'localhost');
//2.Your database name
define('DB_NAME', 'labpress');
//3.Your database user name
define('DB_USER', 'labpress_user');
//4.Your database user password
define('DB_PASS', 'your_strong_password');


//!The following logical code you shouldn't modify!
try {
    $pdo = new PDO(
        "mysql:host=" . DB_HOST . ";dbname=" . DB_NAME . ";charset=utf8mb4",
        DB_USER,
        DB_PASS,
        [
            PDO::ATTR_ERRMODE => PDO::ERRMODE_EXCEPTION,
            PDO::ATTR_DEFAULT_FETCH_MODE => PDO::FETCH_ASSOC,
            PDO::ATTR_EMULATE_PREPARES => false
        ]
    );
} catch (PDOException $e) {
    die("Database Connect Error: " . $e->getMessage());
}
//Time zone configuration
date_default_timezone_set('Asia/Shanghai');
- Replace
DB_NAMEwith the database you created in the previous step. - Replace
DB_USERandDB_PASSwith the credentials of a user that has full access to that database. - Keep
DB_HOSTaslocalhostunless your database is hosted remotely.
4.3 Important Security Notes
- Do not commit or push your own
config.phpfile to a public repository if it contains real database credentials. - Before sharing or publishing your modified project, remove any real database information (database name, username, password) from
config.php. - Ensure that
config.phpis excluded from version control. You can add it to.gitignoreif it is not already listed.
5. Setting Directory Permissions
LabPress uses several directories for storing uploaded files and plugin packages. These directories must be writable by the web server process. On Linux or macOS systems, the recommended permissions are 755, which can be applied with the following commands:
If your web server runs under a dedicated user such as www-data, you may also need to adjust file ownership. For Apache servers, this is typically done with:
On shared hosting environments, 755 is usually sufficient, but some configurations may require 775 if the web server operates as a group user. If you encounter permission-related errors after installation, verify that these directories are writable by the PHP process.
6. Accessing the Site
Once the database connection has been configured and the necessary permissions have been set, the LabPress frontend can be accessed by opening your web browser and navigating to your domain root:
You should see the homepage populated with the sample slides, project highlights, and publications that were imported from labpressexample.sql. If the page appears blank or displays a database connection error, verify the credentials in includes/config.php and confirm that the MySQL service is running.

Index Page:Here is LabPress Default Index Page.
The administration panel is available at:
The default administrator credentials included in the sample data are:
- Username:
root - Password:
lab123456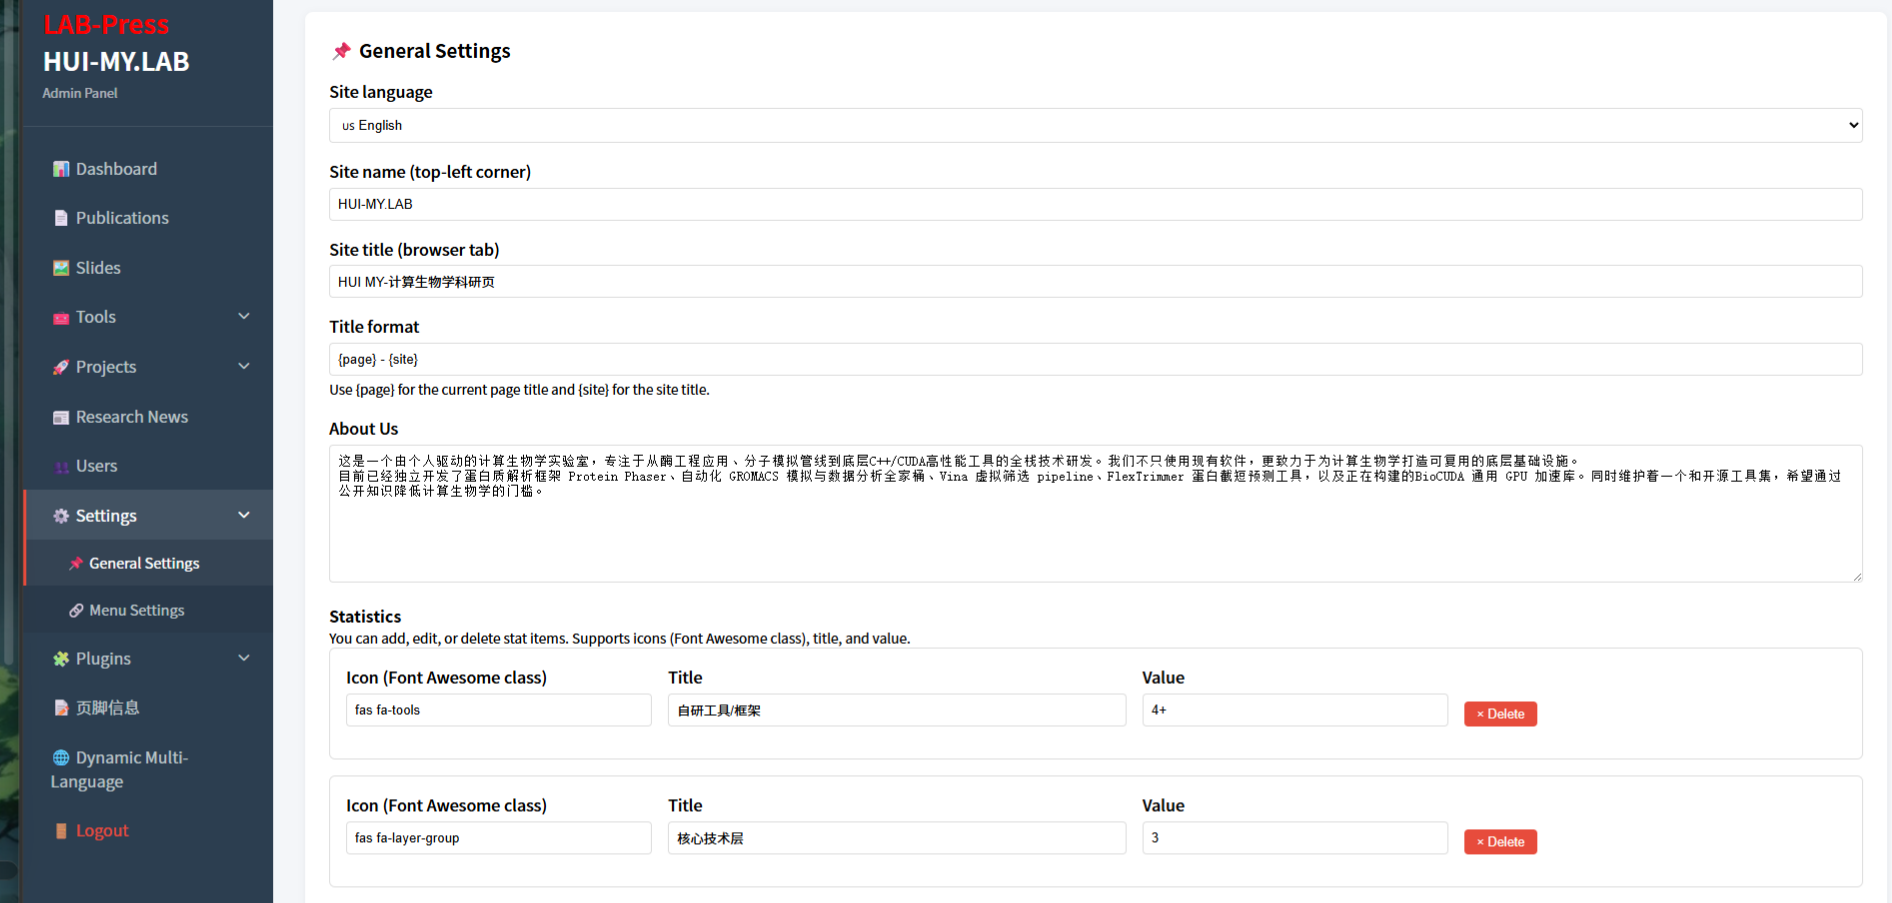
Administrator Panel:Here is LabPress Administrator Panel Setting Page.
For security reasons, you should change this default password immediately after your first login. This can be done from the Users management page in the admin sidebar.
7. Security Recommendations
After installation is complete, keep the following security practices in mind.
Ensure that includes/config.php is never publicly accessible. This file contains database credentials and should be protected by the server configuration. Avoid committing config.php to a public repository if it contains real credentials. The provided .gitignore file may already exclude it, but this should be verified before any code is pushed to a remote repository.
Use HTTPS on all production deployments. A valid SSL certificate protects login credentials and other sensitive data transmitted between the browser and the server. Most hosting control panels, including the BaoTa panel, provide tools for deploying free certificates.
Regularly back up both the web directory and the MySQL database. Database backups are especially important if you plan to update the system or install new plugins. If you discover a security vulnerability, refer to SECURITY.md for the proper reporting process.
8. Troubleshooting Common Installation Issues
The following sections describe some common problems that may occur during installation and how to resolve them.
Blank Page or Database Connection Error
If the frontend or admin panel is blank or displays “Database Connect Error,” check the values in includes/config.php. Confirm that the database server is running and that the credentials are correct. You can also create a temporary phpinfo.php file to verify that the pdo_mysql extension is enabled.
SQL Import Fails with Collation Error
The sample SQL file was exported from MySQL 8.0 and may use utf8mb4_0900_ai_ci collation. If you are using MySQL 5.7, import may fail. To resolve this, open labpressexample.sql in a text editor and replace all occurrences of utf8mb4_0900_ai_ci with utf8mb4_general_ci before importing.
Images Not Displaying
If images appear broken, make sure that the images/ and uploads/ directories exist and contain the files referenced in the database. The web server must have read access to these directories. If you installed LabPress in a subdirectory, verify that image paths in the database match the actual URL structure.
Plugin Installation Fails
The plugin upload installer requires the PHP zip extension. If installation fails, check that this extension is enabled and that the plugins/ directory is writable. The plugin installation page includes a system environment panel that shows the current status of these requirements.
Language Switching Does Not Work
If the language switcher does not change the interface language, ensure that language files are present in both languages/zh_CN/ and languages/en_US/. For database-stored content translation, the Dynamic Multi-Language plugin must be activated. Clearing browser cookies or testing in a private window can also rule out stale language preferences.
10. Next Steps
After completing the installation, proceed to the Quick Start guide. That guide explains how to create your first publication, project, news item, and customize the homepage content using the administration panel.